It is recommended to perform a backup of Windows Server to easily recover data and applications from any data disaster scenario. A disaster can come in any shape, such as accidental file deletion, system crash, software malfunction, malware attack, etc. Microsoft offers an installable Windows Server Backup Restore feature that users can use to make regular backups of Windows Server. In this blog, we will have a detailed discussion on the Windows Server Backup feature with the step-by-step guide on how to install and use it to make the backup.
Windows Server Backup – Brief Overview
Windows Server Backup (WSB) is a backup and recovery feature offered by Windows that makes a backup copy of the whole disk volume into another local disk. Once done, you can later use the backup to restore individual datasets or the entire disk. For example, if your system is crashed or Windows is not starting, you can use the backup file to restore the system volume and get your operating system back to operation in no time.
Steps to Install Windows Server Backup
 Windows Server Backup is an installable backup feature in Windows. Follow the below steps to install Windows Server Backup:
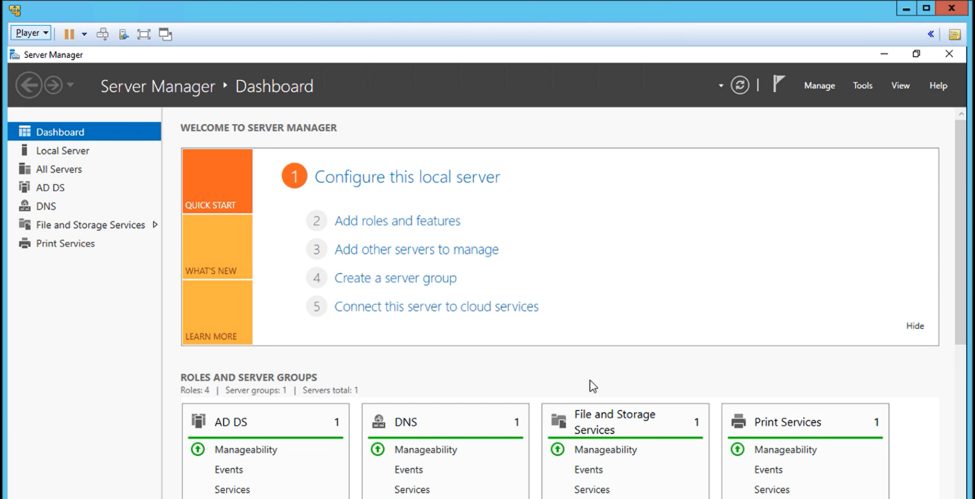
1. Launch “Server Manager” and click “Add roles and features” from the main dashboard.
2. Click “Next” multiple times until you reach the “Features” section. From there, look for “Windows Server Backup“, tick its checkbox, and click “Next“.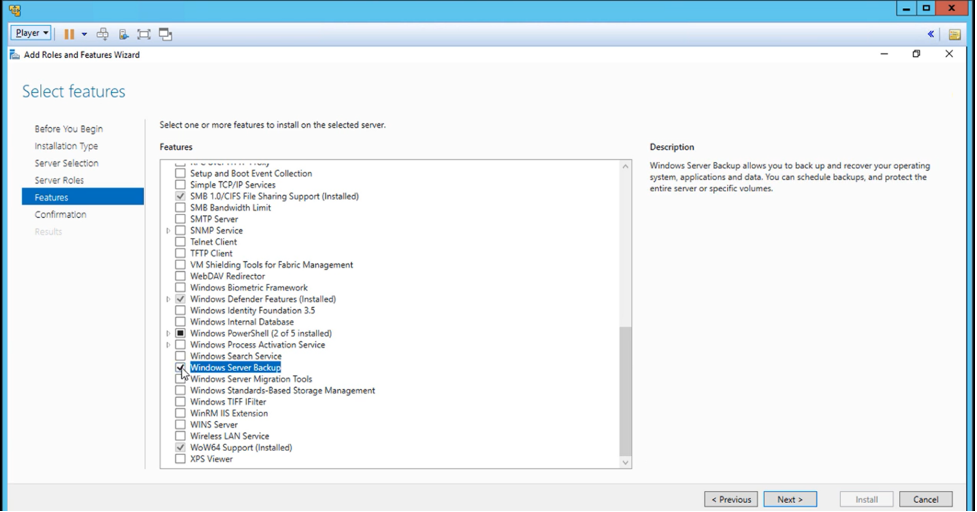
3. Wait till the installation process is completed. Once done, click “Close“.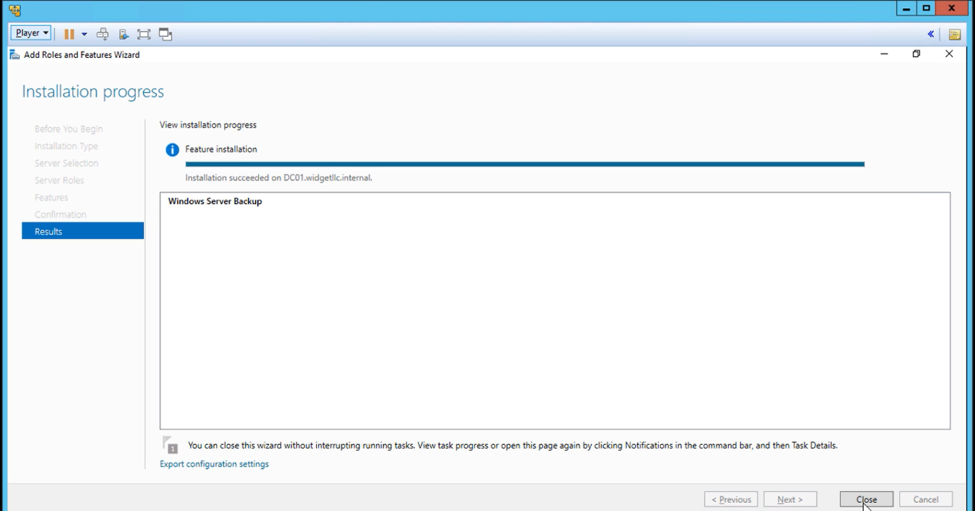 This way, you have successfully installed and configured Windows Server Backup.
Steps to Perform One-Time Server Backup via Windows Server Backup
Follow the below steps to perform a one-time backup of Windows Server with WSB:
1. In the Windows Search bar, type “Run” and click the app shown in the “Best match” section.
2. In the Run pop-up window, type “wbadmin.msc” to launch the Windows Server Backup utility.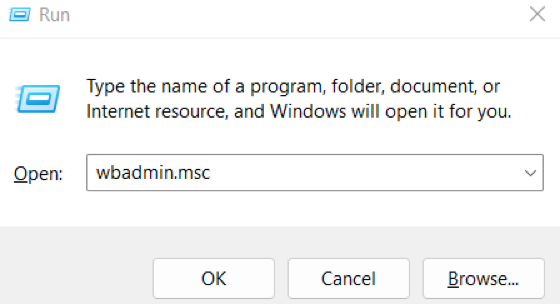
3. In the Windows Server Backup utility, click “Backup Once” from the right sidebar and then click “Next” to initiate the process. 4. You can perform multiple types of backups with WSB. So, now you have to choose either “Full server” or “Custom” backup. In a full server backup, all the Server data and applications will be backed up.
On the other hand, custom backup gives you the option to choose the data and applications you want to backup. If you are doing WSB based backups for the first time, then you can pick “Full server“. Afterward, click “Next”.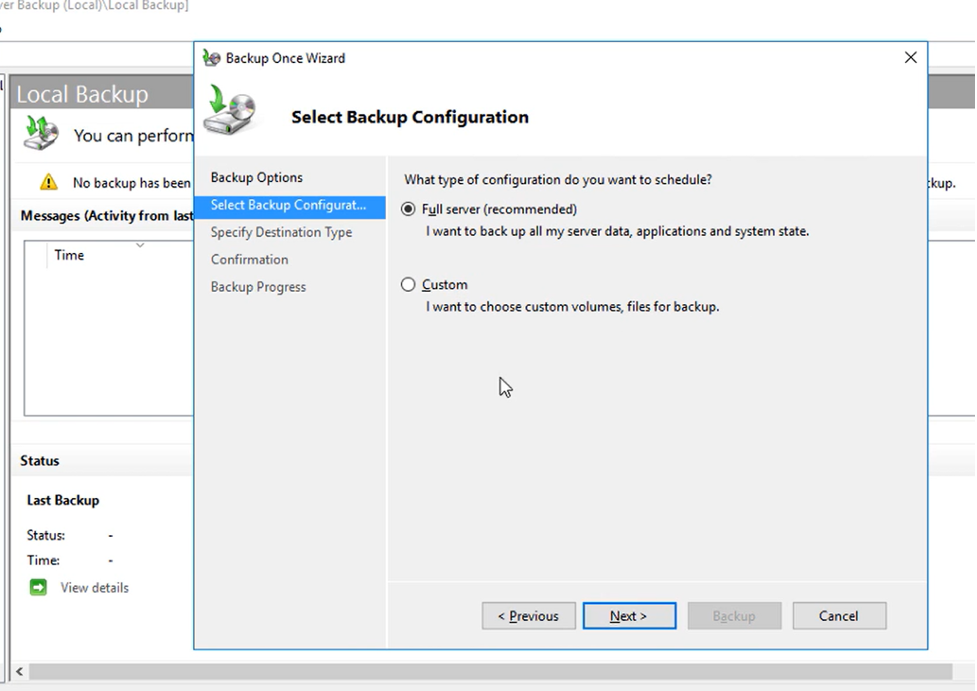 However, if you choose “Custom“, then you can also pick what nature of Volume Shadow Copy Service backup you want to have.
5. Now you have to choose where you want to store the backup. You can either pick “Local drives” or “Remote shared folder“. So, pick the choice that suits you and click “Next“.
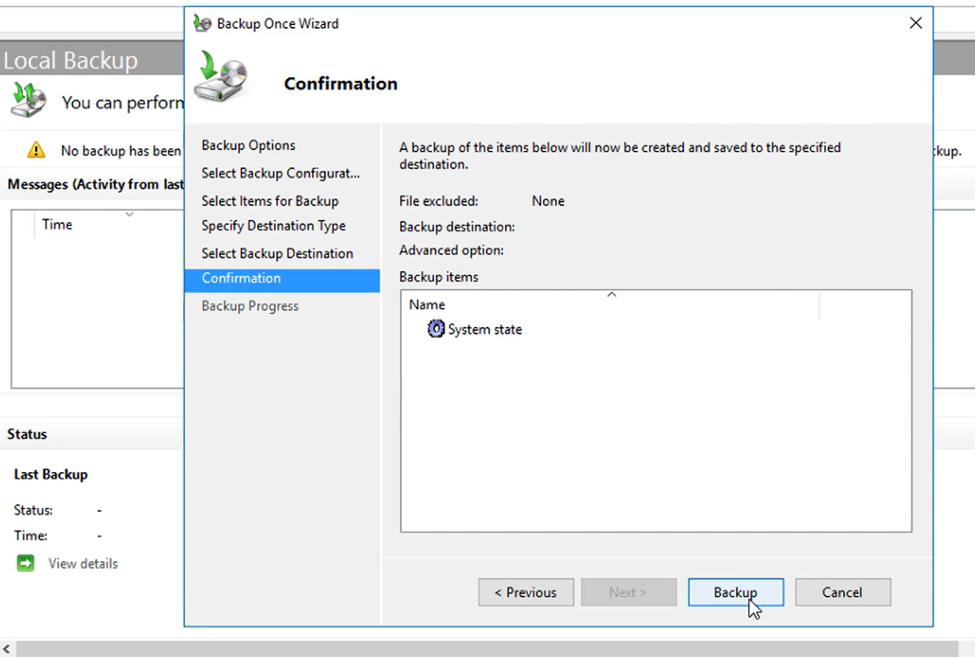
If you select local drives, then you have to specify the drive where you want to store the backup. Similarly, if you select the Remote network share folder, then you have to provide the shared folder address.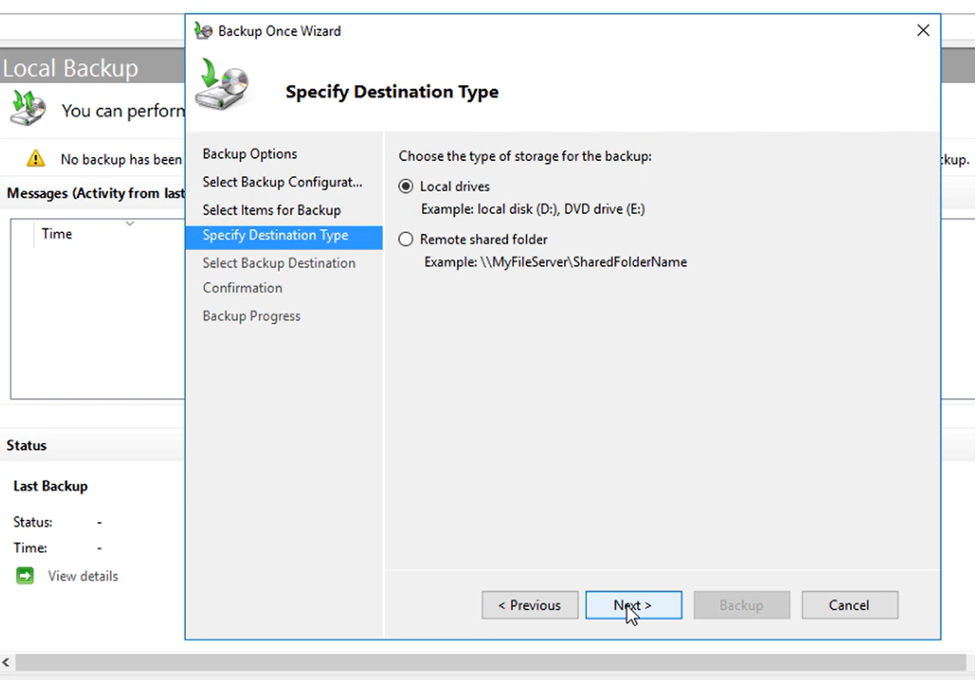 6. Lastly, confirm all the settings and click “Backup“.
 The tool will start creating the backup of the Windows Server. So, wait till the process is completed. Once done, you have successfully made a backup of Server 2012 or whichever version you are using. This way, you can now feel free and satisfied that you have a backup in place that you can quickly restore in case of any data calamity.
Steps to Schedule Server Backups via Windows Server Backup
In the above steps, we have learned how to create a one-time Server backup. But you can also schedule backup with Windows Server Backup. Follow the below steps to do it:
1. In the Windows Search bar, type “Run” and click the app shown in the “Best match” section.
2. In the Run pop-up window, type “wbadmin.msc” to launch the Windows Server Backup utility.
3. In the Windows Server Backup utility, click “Backup Schedule” from the right sidebar.
4. Select either “Full server” or “Custom” backup configuration and click “Next“.
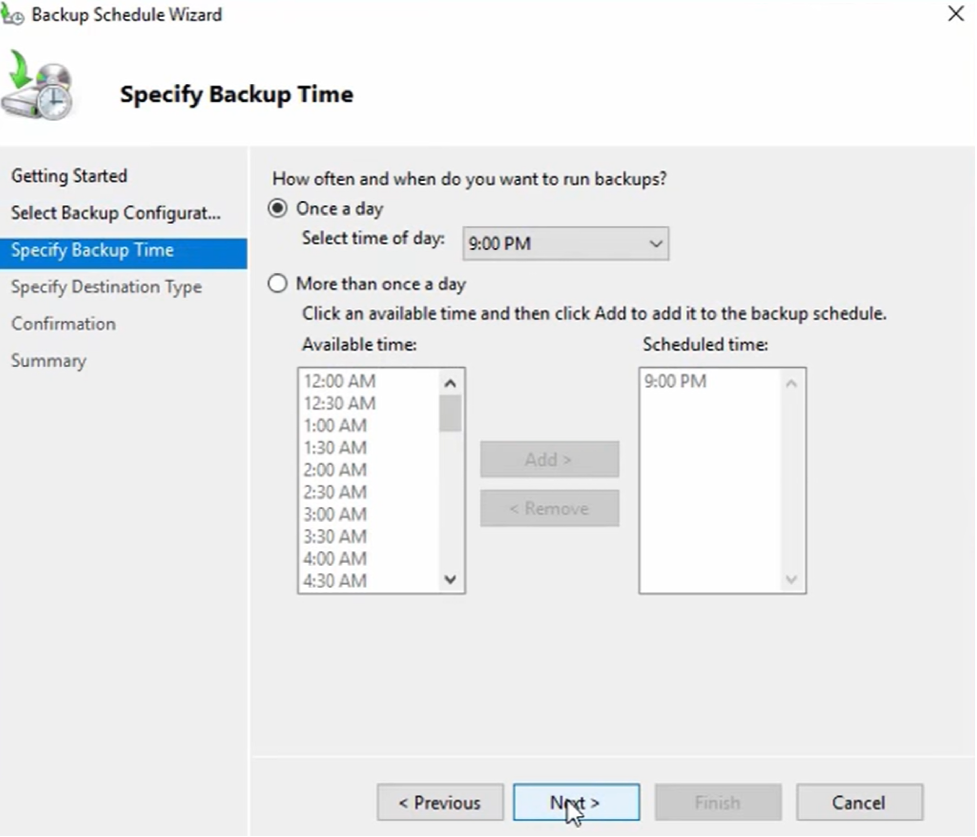
5. Choose how frequently you want to create backups. Finalize the settings as you like and then click “Next“.
6. Select the backup destination and click “Next“.
7. Lastly, confirm all the settings and click “Finish“.
 This way, you have successfully created the backup schedule for your Windows Server. From now onwards, Windows Server Backup Restore will automatically create backups as per scheduled times without disturbing you.
Step to Restore Server Backups via Windows Server Backup
We have learned how to create Server backups, but are you aware of how to restore backups after any data calamity, such as accidental deletion, malware attack, system crash, etc. Following are the steps you have to follow to restore Server backups with the WSB utility:
1. In the Windows Search bar, type “Run” and click the app shown in the “Best match” section.
2. In the Run pop-up window, type “wbadmin.msc” to launch the Windows Server Backup utility.
3. In the Windows Server Backup utility, click “Recovery Wizard” from the right sidebar.
4. Choose the backup that you want to restore and click “Next“. You have to select the backup based on the date and time.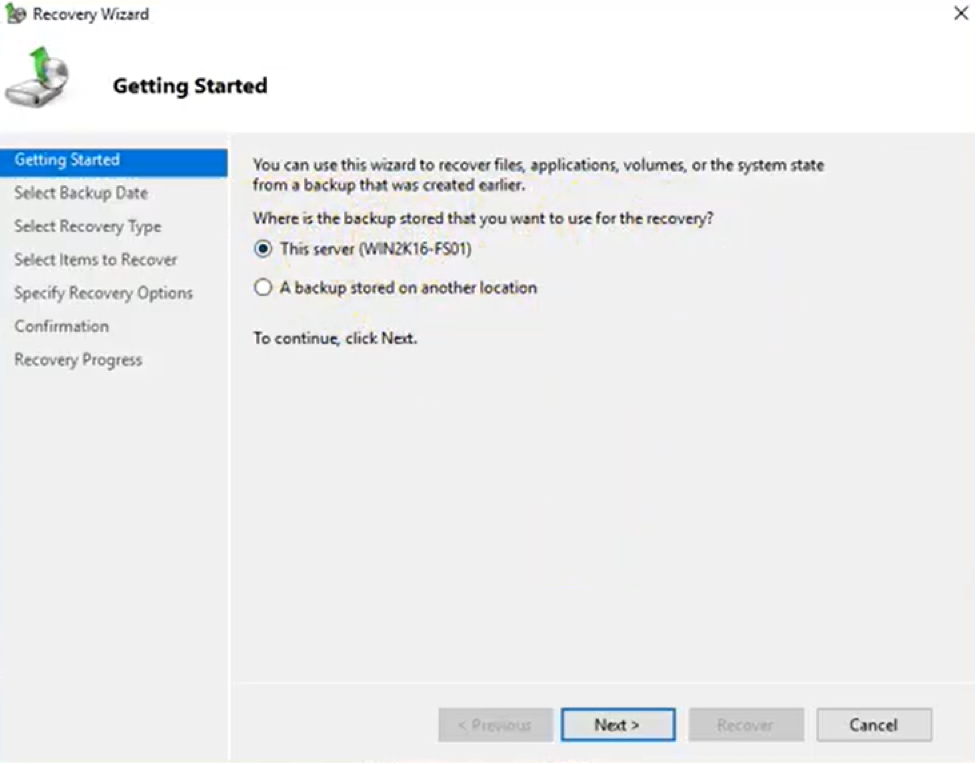 5. Now select the recovery type. You can pick “Files and folders“, “Hyper-V“, “Volumes“, “Applications“, or “System state“. Afterward, click “Next“.
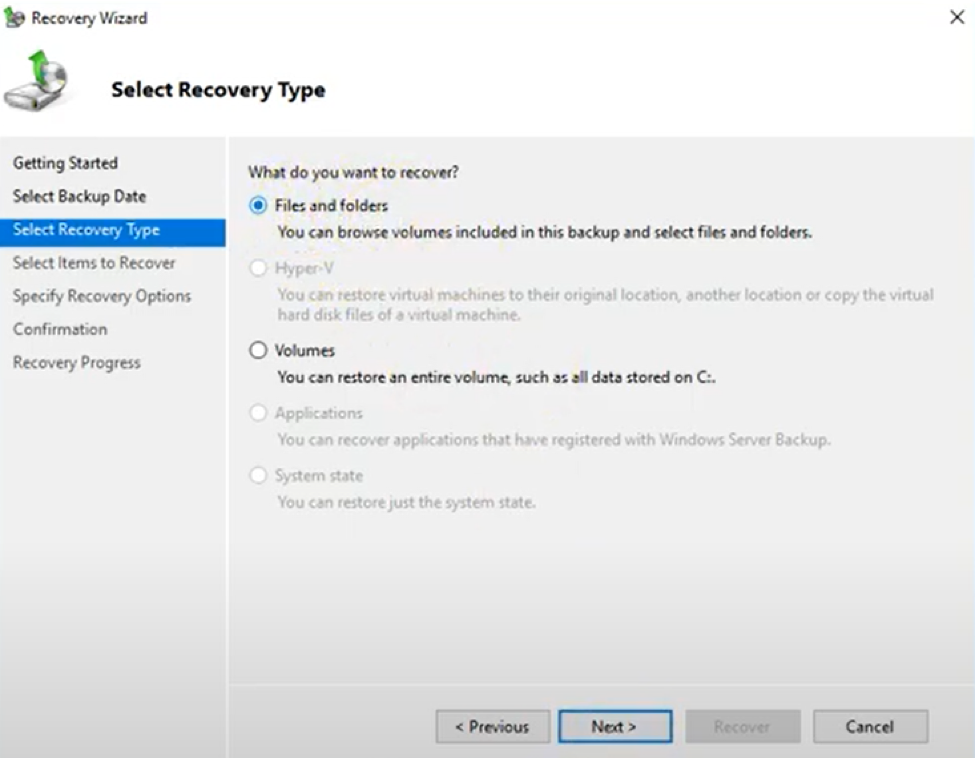 6. Select the items you want to recover and click “Next”.
7. Specify the recovery location. You can pick “Original location” or other options. Once done, click “Next“.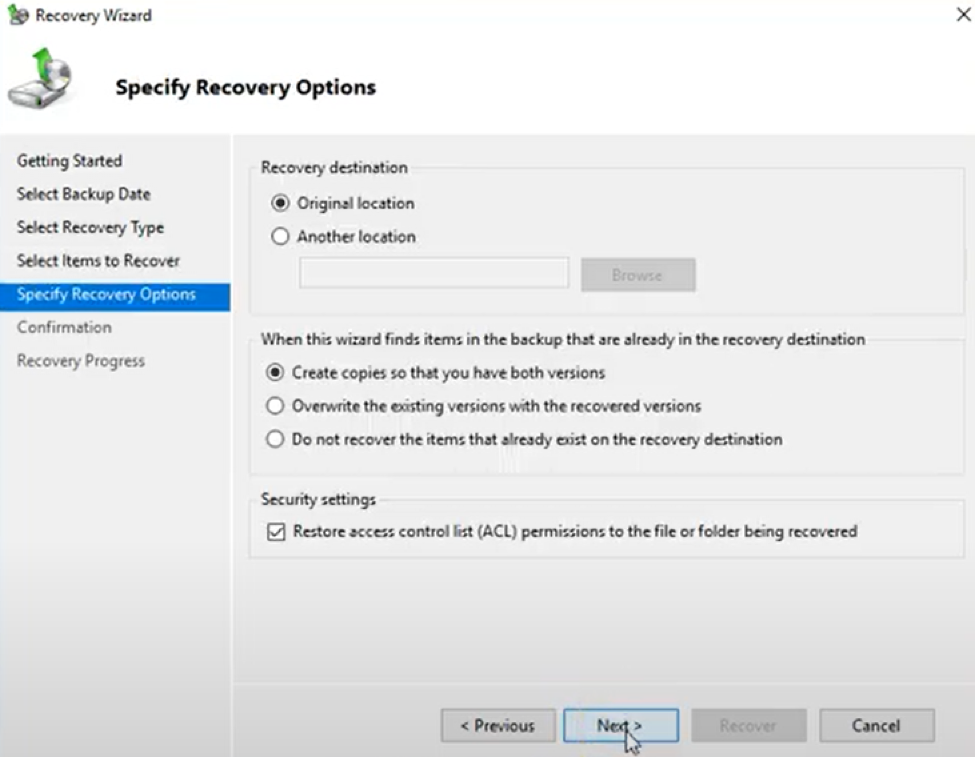 8. Lastly, confirm all the settings and click “Recover“.
The tool will start recovering the backed-up data into the desired destination. Wait till the process is completed and then you are all set to access the data.
Wrapping Up
Windows Server backup presents as one of the effective backup methods to create accurate backups of server operating systems. By following the above steps, you can easily create backups of Windows Server and restore whenever you need. Other than this backup utility, there are many other Windows Server backup solutions available today that can even offer faster solutions to backup Windows Server, such as Microsoft Azure, Acronis Backup, Backup Everything, etc.
In short, it does not matter which backup method you use, but you must ensure regular backups of the Windows Server to avoid any major data calamity and ensure effective data protection.
A Step-By-Step Guide on How to Perform Windows Server Backup