
The Language of Modern Data Management
All of your data stored on the internet today is managed through databases. Through these databases, users can store data online. Such databases exist as a virtual storage medium, whereas a physical system exists to support them. This support on the backend is brought forward by data servers which act as this physical system.
To communicate with these databases for the purpose of accessing such a database, a medium is required. This medium helps form a bridge between the database and the user. Such as, allowing the user to convey to the database whatever data is required. The most popular medium that exists today to serve this purpose is the Structured Query Language (SQL).
FREE TRIAL FOR 30 DAYS – TRY IT NOW
Scope of MySQL
In a modern database, data is held in a certain structure. This structure is used to utilize storage space as efficiently as possible. The data within these structures co-exist in the form of variables and entities.
Modern databases utilize servers to store data. MySQL is a modern database management system to manage this data. It works by communicating with the database. MySQL is thus a software environment allowing users to store and edit data. Its core functionality allows users to manipulate data stored on MySQL servers.
Power of Backups
It might not be a stretch to consider data as a business most valuable resource today. It holds immense value, realized in the form of a financial gain or loss. This is why an organization’s data needs to be efficiently managed. Suppose any external event causes your data to be lost. In such a scenario, considerable financial damage can be done.
To stop this from happening, businesses should keep all important data backed up. Within database management, MySQL backups work in the same way. When we talk about MySQL backups, the backup file data in question is usually in large volumes.
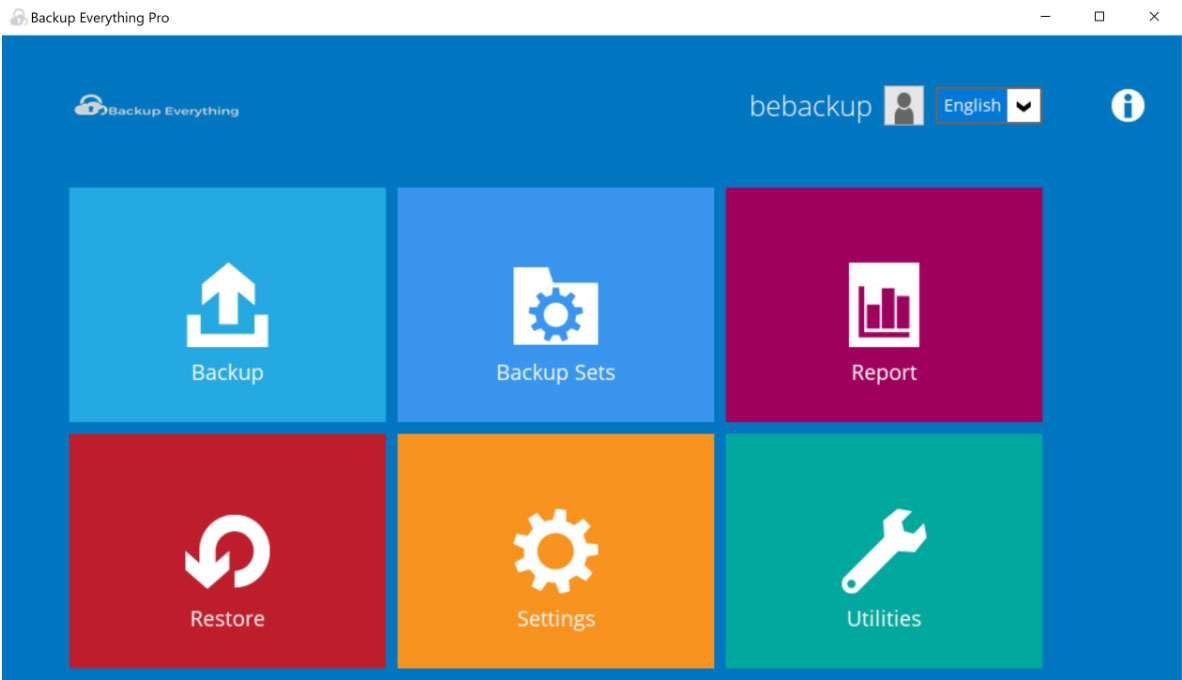
The Main Dashboard for the BE client
Stored on servers, this large volume of data requires an efficient backup process. If lost, the damage can be greater than for one single user. For businesses, this can even translate to long term damage.
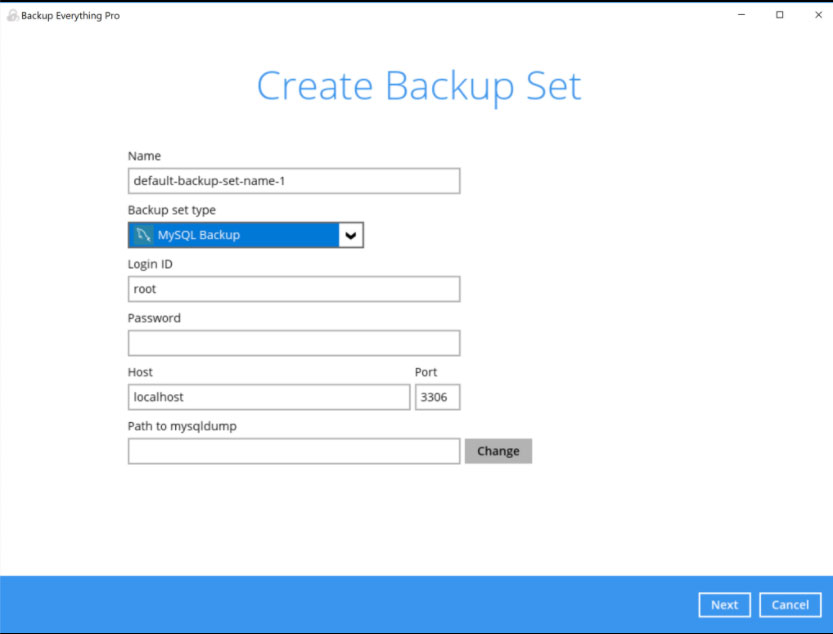
To backup your MySQL database, you should first consider your personal requirements. From there, the best possible backup type can be chosen. After that, the process to make a copy of the database can start.

The Main Dashboard for the BE client
Choosing the right backup set
To restore a database, a similar procedure can be followed that is dependent on the volume of data. The backup and restore process can also be done through the system software or through the command line. Both alternatives will restore your MySQL database.
Backup and Restore your MySQL Databases
Two primary methods are present to backup your MySQL database. The phpMyAdmin tool available through the use of a browser can be used to backup data. Additionally, users can even use the MySQL command line to back up the database.
Backing up SQL databases through phpMyAdmin
phpMyAdmin pro allows users to backup data available on a database. The software is open-sourced and can be used through a browser. It’s used to manage MySQL database servers.
Users can follow the below-mentioned steps to backup through this application:
- To open phpMyAdmin, go to http://localhost/phpMyAdmin Additionally, you can even visit http://127.0.0.1/phpMyAdmin to open the software.
- If you’re a routine user, enter the required credentials to access the database. In the case of first-time access, just enter by using a blank password
- Browse towards the left of the interface. In a list, the names of all the available databases will show up.
- For the sake of argument, suppose the name of our database is ‘dbbackup’.
- Once selected, browse for the ‘Export’ tab on the interface. It will be alongside tabs such as, ‘Structure’, ‘SQL’, ‘Query’ etc.
- Once the ‘Export’ tab is selected, choose ‘Quick’ as the export method. For the output format, choose ‘SQL’.
- Click the Go button to proceed.
The backup process will now start. phpMyAdmin will export the entire database in the form of a text file. The text file created will contain the names of all the SQL statements used. Users will now have to wait for the backup process to finish.
Once done, your browser will ask you to choose the download destination. The entire backup will be downloaded as a text file. Make sure to save the backup file in a safe location.
Restoring SQL databases through phpMyAdmin
The backup that now exists as a text file can be restored at any point. Once restored, phpMyAdmin will restore all of the data of the text file as the original database.
To restore MySQL databases, follow these steps:
- Again, users will need to enter http://localhost/phpMyAdmin or http://127.0.0.1/phpMyAdmin in the browser.
- Make sure the ‘Databases’ tab is selected.
- On the left side of the interface, browse and select the ‘New’ command
- Once asked, enter the name for the new database. Select ‘uttf8_general_ci’ in the field next to it.
- Press ‘Create’ to create the database. Once down, the new database will appear on the left of the screen.
- To add data into this database, select the new database to open a new window.
- Here, select ‘Import’ located at the top bar.
- Click on ‘Browse’ and choose the text file containing the backup data.
- Click the Go button to proceed.
The software will now import all of the data within the database. After some time, the software will indicate that the database has been restored. You can view the contents by selecting the databases from the interface.
It should be kept in mind that phpMyAdmin does not allow files greater than 128 MB to be uploaded. This is where larger file sizes can become an issue. However, the configurations within PHP can be manually changed.
Backing up SQL databases through the Command Line
The second alternative that allows you to backup your MySQL server data is using SQL commands. Here, the OS communicates with the database (also known as lock tables) through the command line. This can be the use of command prompt for Windows or a similar terminal for Linux.
The primary command used to backup through this process is ‘mysqldump’. Similar to the use of phpMyAdmin, the contents of the database are copied to a text file. Before starting the process, make sure the MySQL server is actually running.
Follow the below-mentioned steps to start the backup process:
- Open the OS command line, such as the Windows command prompt or Linux Terminal.
- For the sake of argument, suppose the name of the database is ‘dbbackup’. Also, suppose the directory name where this will be copied is called ‘dbbackup.sql’. Write the following command on the command line: /opt/lampp/bin/mysqldump –user=root –password=”” dbbackup > dbbackup.sql Generically, the command shown above follows the below syntax: mysqldump —user [user name] —password=[password] [database name] > [dump file]
- Press enter to run the command and backup the database
Restoring SQL databases through the Command Line
Databases within MySQL servers can easily be restored through the command line. These are databases that are already backed up as a text file. The user will need to enter the path of the text file. Once the command is entered, the text file will be restored to its original database form.
Follow the below steps:
- First, ensure that the MySQL server is properly running.
- Open the OS command line. Such as the command prompt for Windows.
- Users will first need to create a new empty MySQL server database. This database will be needed to hold the data that will be restored in the future. Suppose the name of this new database will be ‘dbbackup’. Write the following command to create a new database: /opt/lampp/bin/mysql –user=root –password=”” -e “CREATE DATABASE dbbackup” In the above command, users will need to enter the correct database access credentials. Here the credentials are ‘root’ as the MySQL user. The MySQL u root helps login as the root user. The root user acts as the main system administrator. An empty space indicates that there’s no password required.
- Now, a command will be needed to import the contents of the backed-up database. This will restore the data from the database that was backed up into the newly created database. Here, the name of our new database was ‘dbbackup’. Suppose the name of the text file containing the backup data is ‘backup_data’. Write the following command in the command line: /opt/lampp/bin/mysql –user=root –password=”” –database=dbbackup < backup_data.sql The process to restore all of the contents of the database will now start. You can even view the restored files through the command prompt. Users should keep in mind that they will now need to change the configurations for their software. The software should now point towards the new database.
What actually is mysql dump?
In its essence, the ‘mysqldump’ utility allows users to backup databases to any external resource. While the command was used to copy a single database, as shown above, it is capable of much more than that.
The mysqldump utility allows a wide range of backup options. It even allows users to backup a database from a server located on the other side of the world. The command in its essence does not actually back up data. The core function of the command recreates the contents of an old database into a new database.
The command shown above was used for a simple backup and restore on the command line. But it also allows for a range of custom options for backups. To understand, let’s break it down:
mysqldump —user [user name] —password=[password] [database name] > [dump file]
The ‘—user’ indicates the account username through which the database will be accessed. The user will have to know the username for the backup to start. A list of usernames is stored in a table within the MySQL database. You can view the entire list, along with the permissions they hold by writing the following command:
use mysql;
select * from user;
The ‘—password’ indicates the password needed to access the database. For new users, this can be a blank space. A user who has previously accessed the database will obviously know the password.
The ‘database name’ field indicates where the backed-up contents are placed. The ‘dump file’ is the destination where the database contents (or dump files) will be placed.
The ‘>’ symbol in MySQL language indicates the output stream. It is a kind of arrow that indicates the direction of the data stream. In the above command, it shows that the data flows from the ‘database name’ towards the ‘dump file’.
Here’s a method to backup more than one databases at once using mysqldump command:
mysqldump –databases mydatabase1 mydatabase2 mydatabase3
> sql.dump
Here’s a method to compress the data that will be backed up into a compressed file on Linux:
mysqldump —user admin –password=password mydatabase123 |
gzip > /usr/local/mydatabase.gz
Here’s a method to copy the contents of an entire MySQL running server to another with a single command:
mysqldump –host=host1 –opt mydatabase | mysql –host=host2
-C newdatabase123
Similarly, a number of other commands also exist to facilitate users through the ‘mysql’ utility. In contrast to the use of phpMyAdmin, this allows for more customizability in backups.
Keeping your MySQL Backups Automated
The procedures showed above help users manually back up their databases. But, relying on manual work to ensure routine backups can be a hassle. This is why automated backups should be kept in mind when considering backing up important data.
In MySQL, a number of methods also exist to help create an automated backup process. Since the data stored on servers is of large volumes, automated routine backups help prevent data loss. The simplest command used in MySQL to automate backups is ‘AutoMySQLBACKUP’.
The ‘AutoMySQLBACKUP’ utility can help backup one more databases. It can even help backup an entire server. A number of other methods also exist to facilitate users with automated backups. The process can be further looked upon and should be kept in mind to make the backup process more efficient.